Changelog
Follow up on the latest improvements and updates.
RSS
Hey there! We’ve got some exciting news! 🎉 Our opt-in pop ups just got a major upgrade with a brand-new feature: The
Reminders Banner
! 💡🛎️ Reminders Banner:
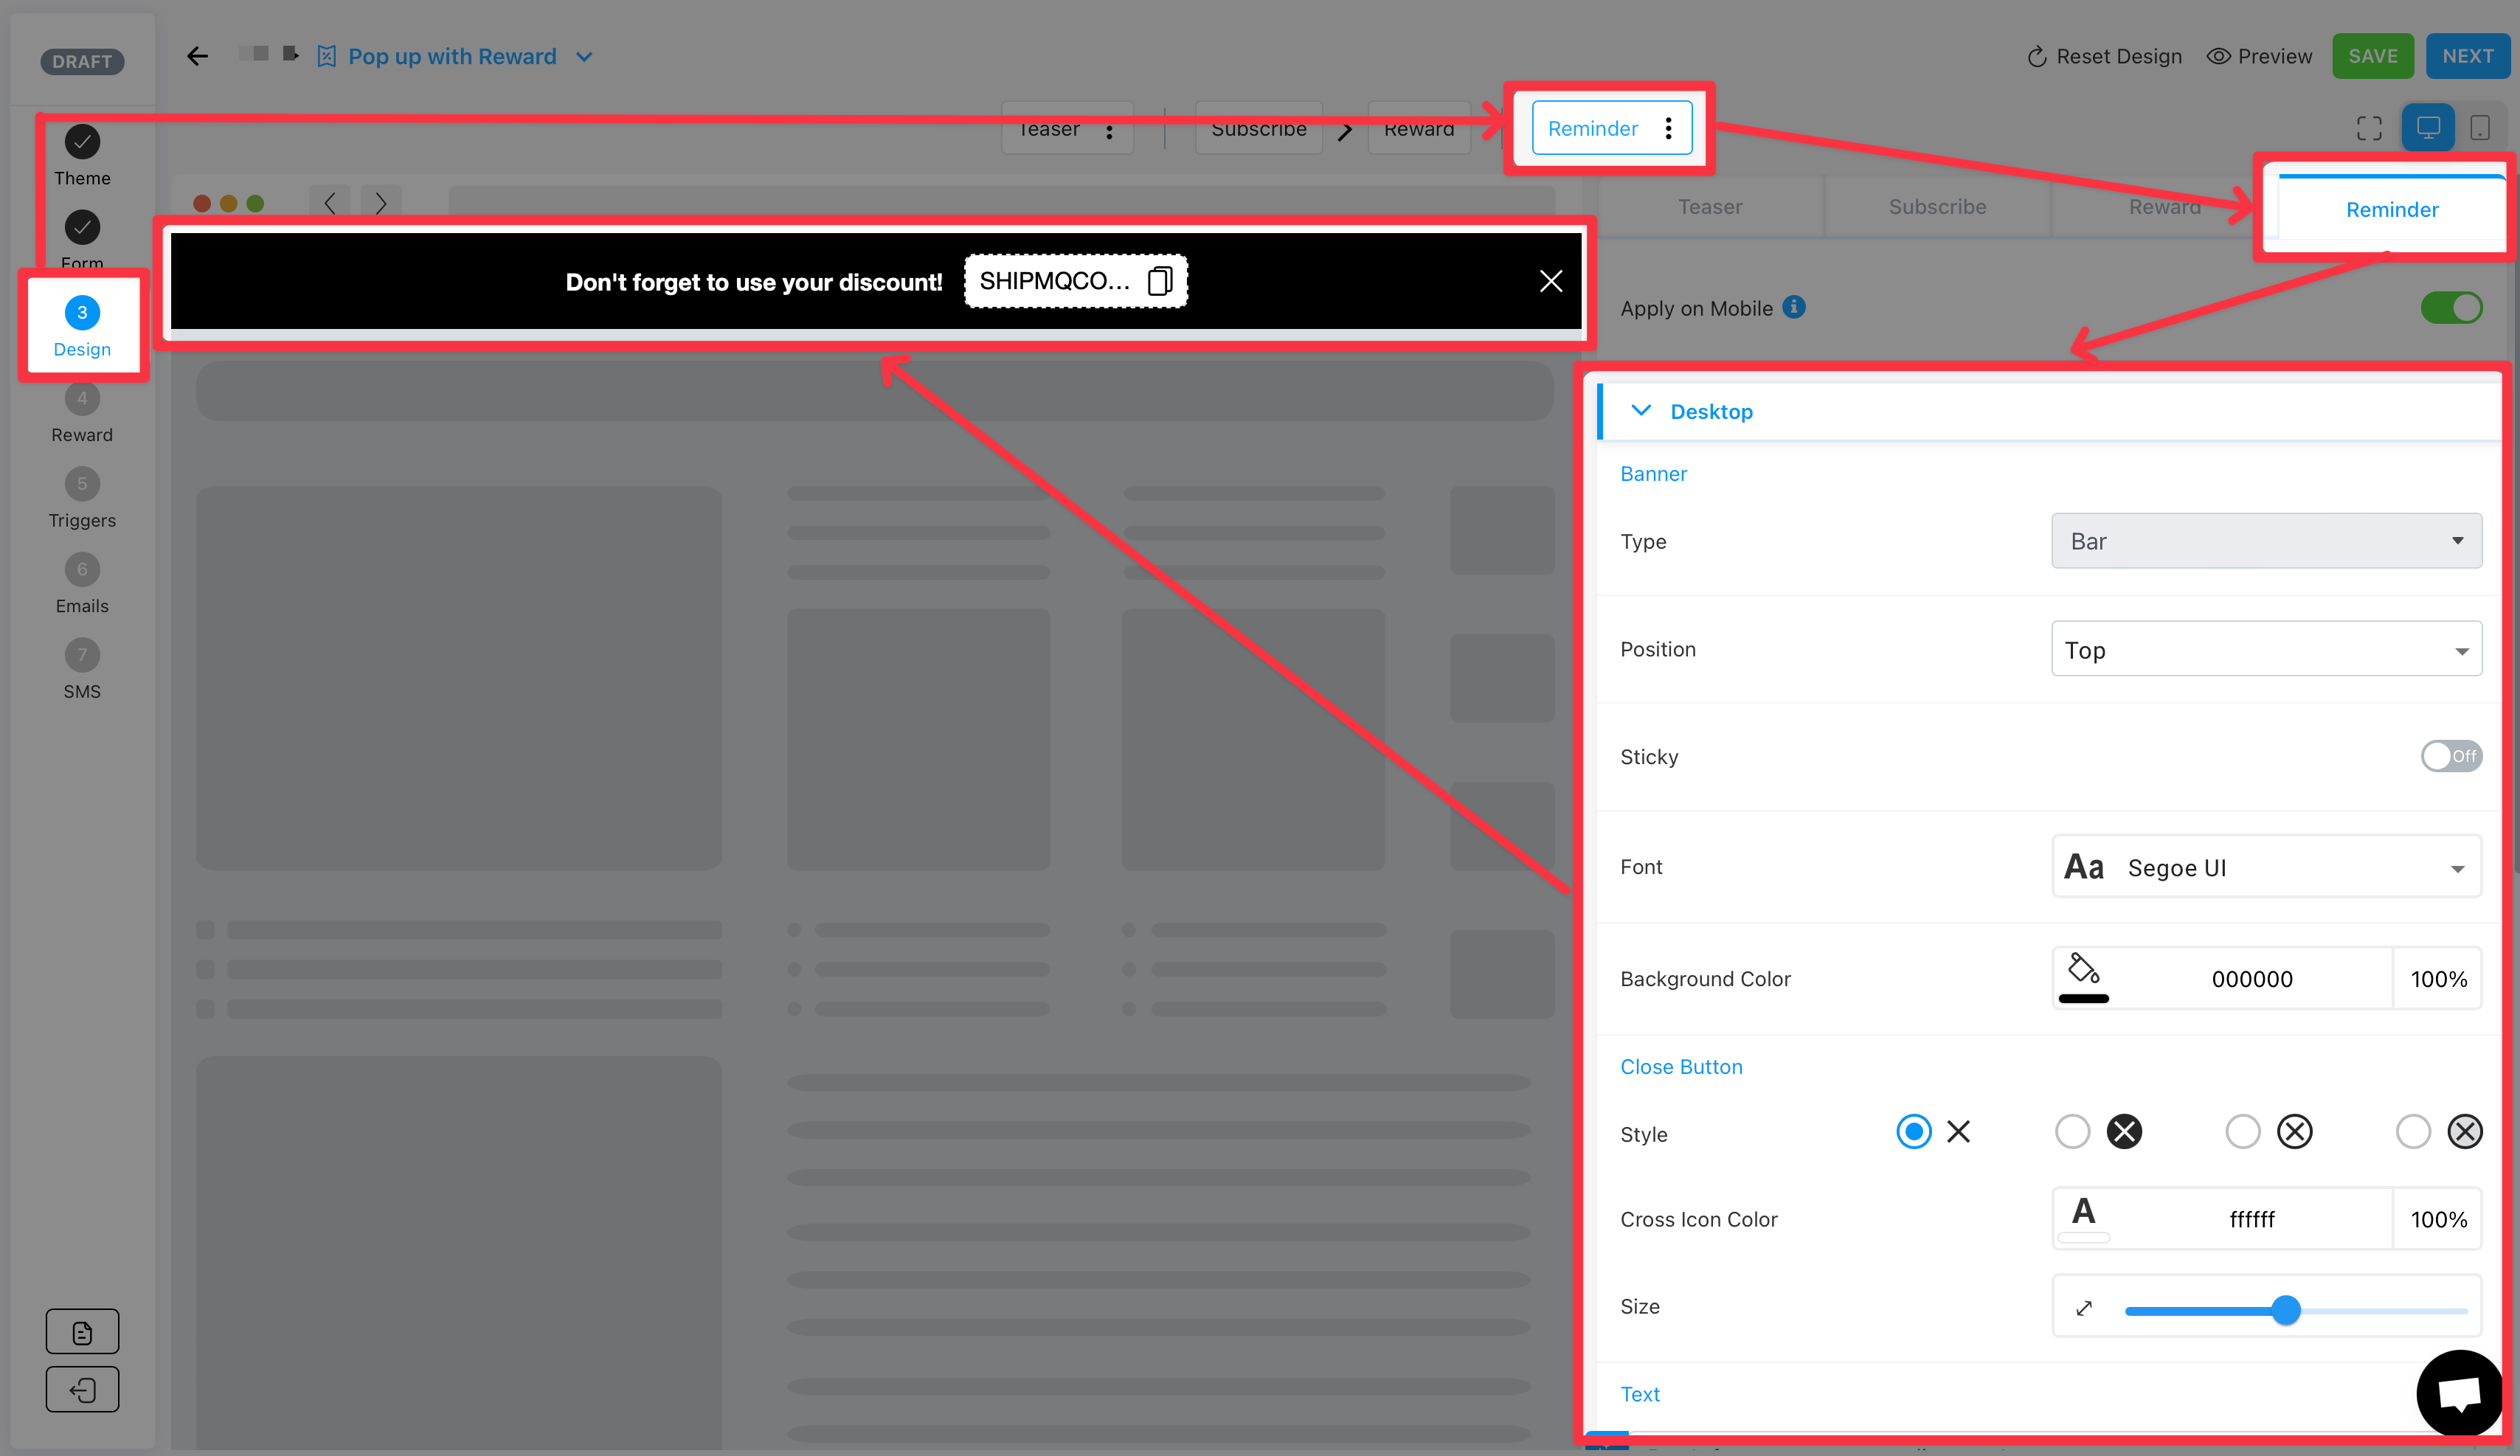
This cool new feature creates an announcement banner on your website once your customers fill out one of our opt-in pop ups (with reward). The banner will remind customers of their coupon code, making it super easy to copy and paste at checkout. 🛒Key Benefits
- 🚀 Enhanced Customer Experience:Keep your customers in the loop with a friendly reminder about their discount codes.
- 💸 Increased Conversion Rates:Make sure your customers don’t forget about their coupons, leading to more sales.
- 🔧 Seamless Integration:The banner fits right in with your website’s design for a smooth and consistent look.
- 👌 Easy to Use:Just set up the Reminders in your Pop Up settings, and you’re good to go!
How It Works
- Set Up the Pop Up:Create or edit your opt-in pop up to include the Reminders Trigger Type.
- Customer Interaction:When a customer fills out the pop up, an announcement banner appears.
- Banner Display:The banner reminds the customer of their coupon code.
- Easy Checkout:Customers can easily copy and paste the code at checkout for their discount.
Feedback and Support
We love hearing from you! If you have any questions or need help, reach out to our support team at support@one.store or on our livechat!
Thanks for choosing us to enhance your ecommerce experience. Stay tuned for more fun updates! 🌟
ONE Team
Get hyper-targeted with your SMS by creating and saving custom segments right in your Shopify backend! 🎉. Now you can dazzle your audience with targeted SMS marketing to specific segments you've crafted. 🚀
🌎 Enhancement:
Geo-Tastic Targeting OptionIntroducing the "+1" option—send SMS messages exclusively to the land of maple syrup and stars and stripes (US and Canada, eh!). 🍁🌟🇺🇸 No more global mishaps; this option ensures your messages hit the right continent every time. 🌍 Thereby ensuring that you're using your SMS credits efficiently.
🔮 How to Unleash the Magic:
Conjuring a new segment that you want to send to? Easy peasy—define your dream team in Shopify using their Customer segment creator for SMS magic. ✨ ONE will automatically ensure to sync that segment directly into our app, so that when you're choosing your recipient list, it will be there waiting for you like magic! 🧙
💫 Perks and Potions:
Boost your marketing mojo with targeted SMS spells for better engagement and conversions. 📈💥Wave goodbye to international texting oopsies; stay compliant and focused with regional targeting. 🌍✅ Simplify your campaign sorcery for maximum impact and customer delight! 🌟🎩
If you have any questions on how to get started, don't hesitate to reach out to our dedicated customer support team!
We've got a brand new feature in your email arsenal that's gonna make your sales sing (and wallets jingle)! 🛎️
Here's the scoop:
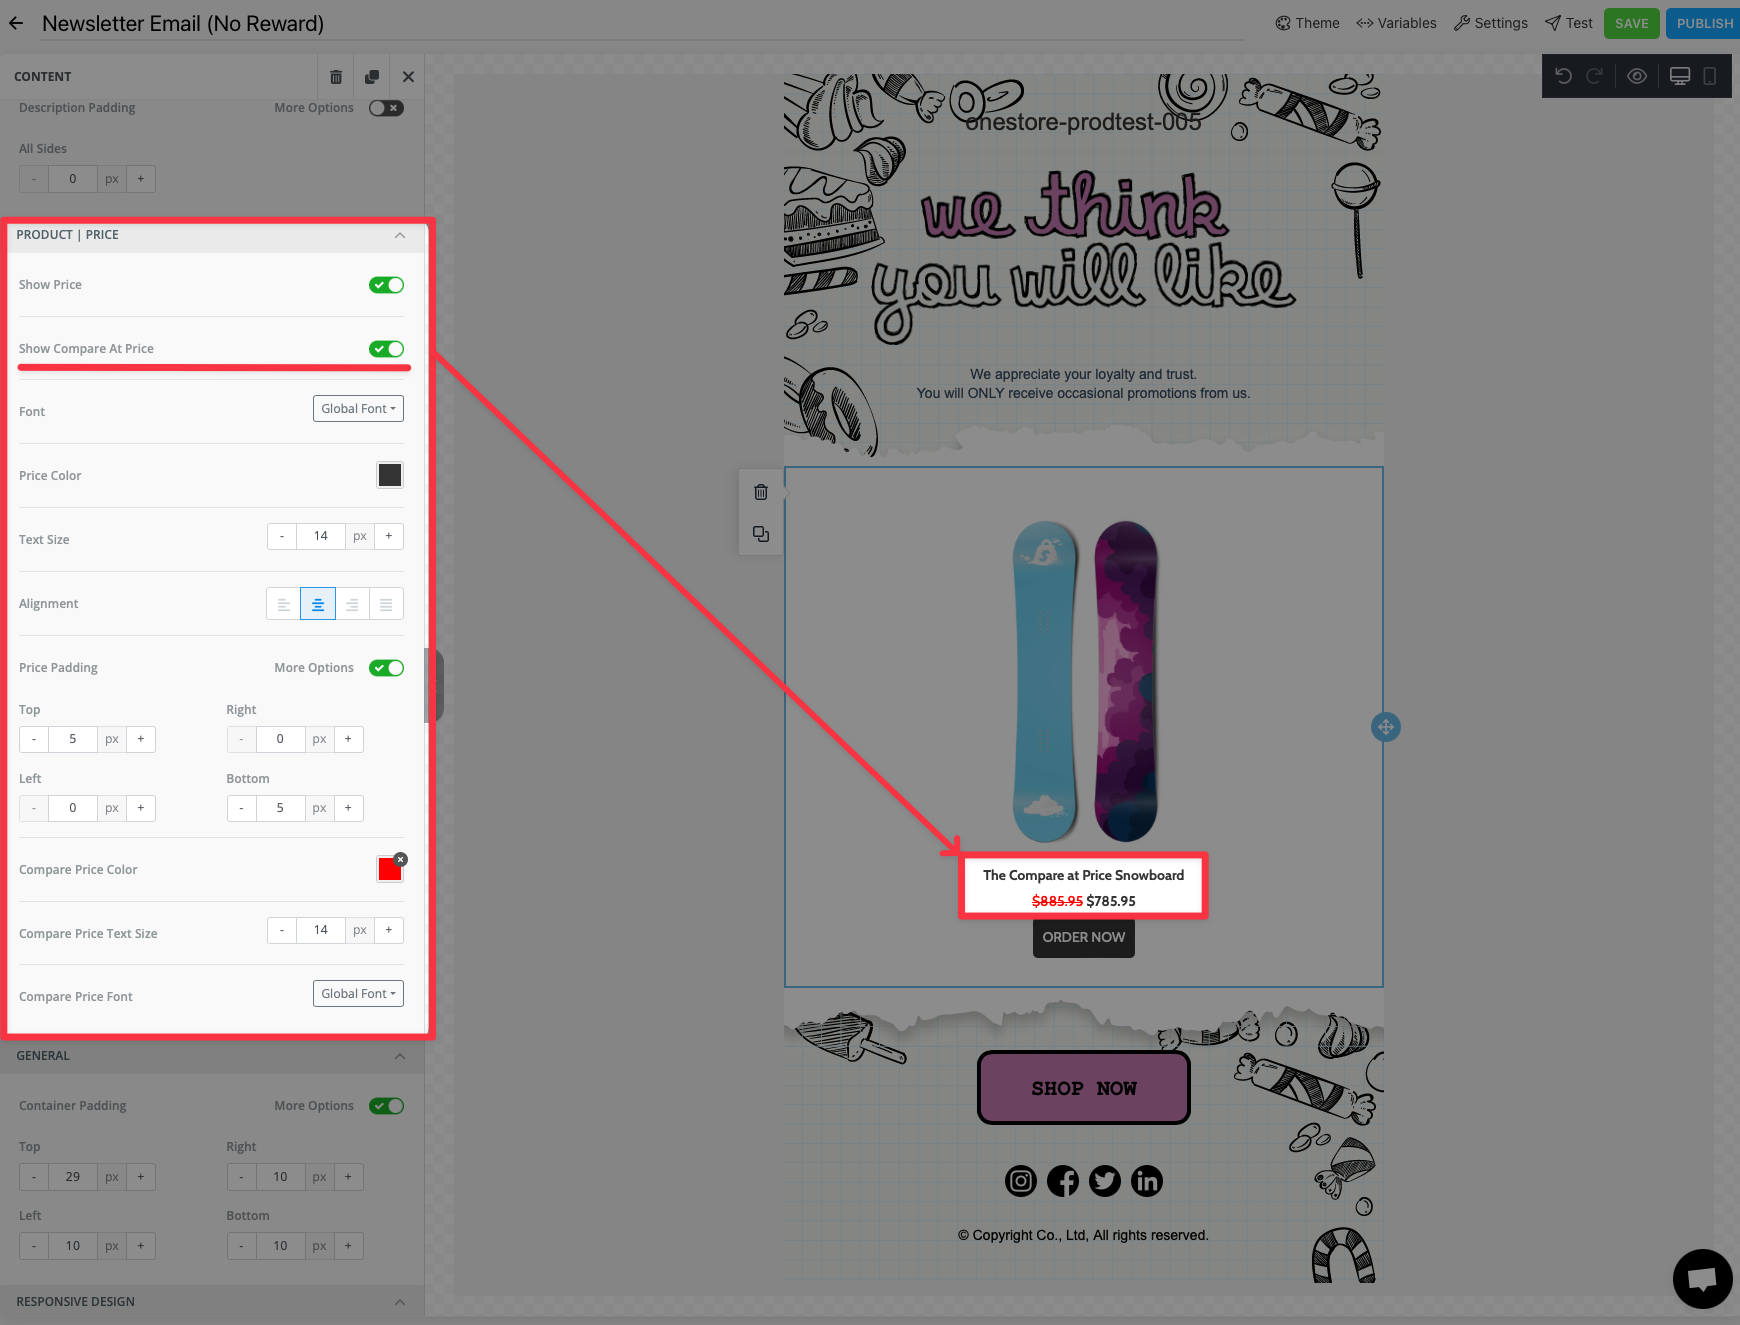
Ever wanted to showcase the "Compare at" prices from your Shopify store directly in your emails? Well, fret no more! Now you can, with our customizable "Compare at" price option!
➡️ How it works:
- Got a product with a juicy "Compare at" price in Shopify? We see you!
- Hop into your email editor and enable the new "Compare at" price option. ✨
- Bam!We'll automatically display the original price with a stylish strikethrough, and showcase your amazing discounted price in all its glory.
Why you'll love it:
*
Boost Conversions:
Who can resist a good deal, right? Showcasing that sweet discount price will entice customers and make them more likely to hit "buy." ➡️ *
Stand Out in the Inbox:
Stand out from the crowd with visually appealing price comparisons. Your emails will be the talk of the town (or inbox)! *
Effortless Setup:
It's as easy as flipping a switch! No code required, just pure marketing magic. 🪄✨So, what are you waiting for? Head over to your email editor and start slashing those (virtual) prices! Let's turn those email opens into epic sales!
We're bursting with excitement to announce a brand new way to grab your visitors' attention with opt-in popups! Now you can choose to have your popups "fly-out" from the side of the screen, adding a touch of dynamism and making them stand out even more than before
Previously, your popups could only appear smack dab in the center of the screen.
Mittelpunkt (that's German for "center point" ) is great, but this update gives you greater control over the initial user experience, allowing you to:- Increase visibility:Fly-in animations can help your popups cut through the noise and capture attention more effectively, making them impossible to miss
- A/B Test for Engagement:Experiment with different fly-in directions (left ⬅️, right ➡️, top , bottom ⬇️) to see what resonates best with your audience. Think of it as a choose-your-own-adventure for popups!
- Create a Unique Brand Experience:Tailor the animation to match your brand personality and overall website design. Think sleek and subtle, or maybe fun and funky – the choice is yours
Getting Started with Fly-in Animations
(it's easier than you think!)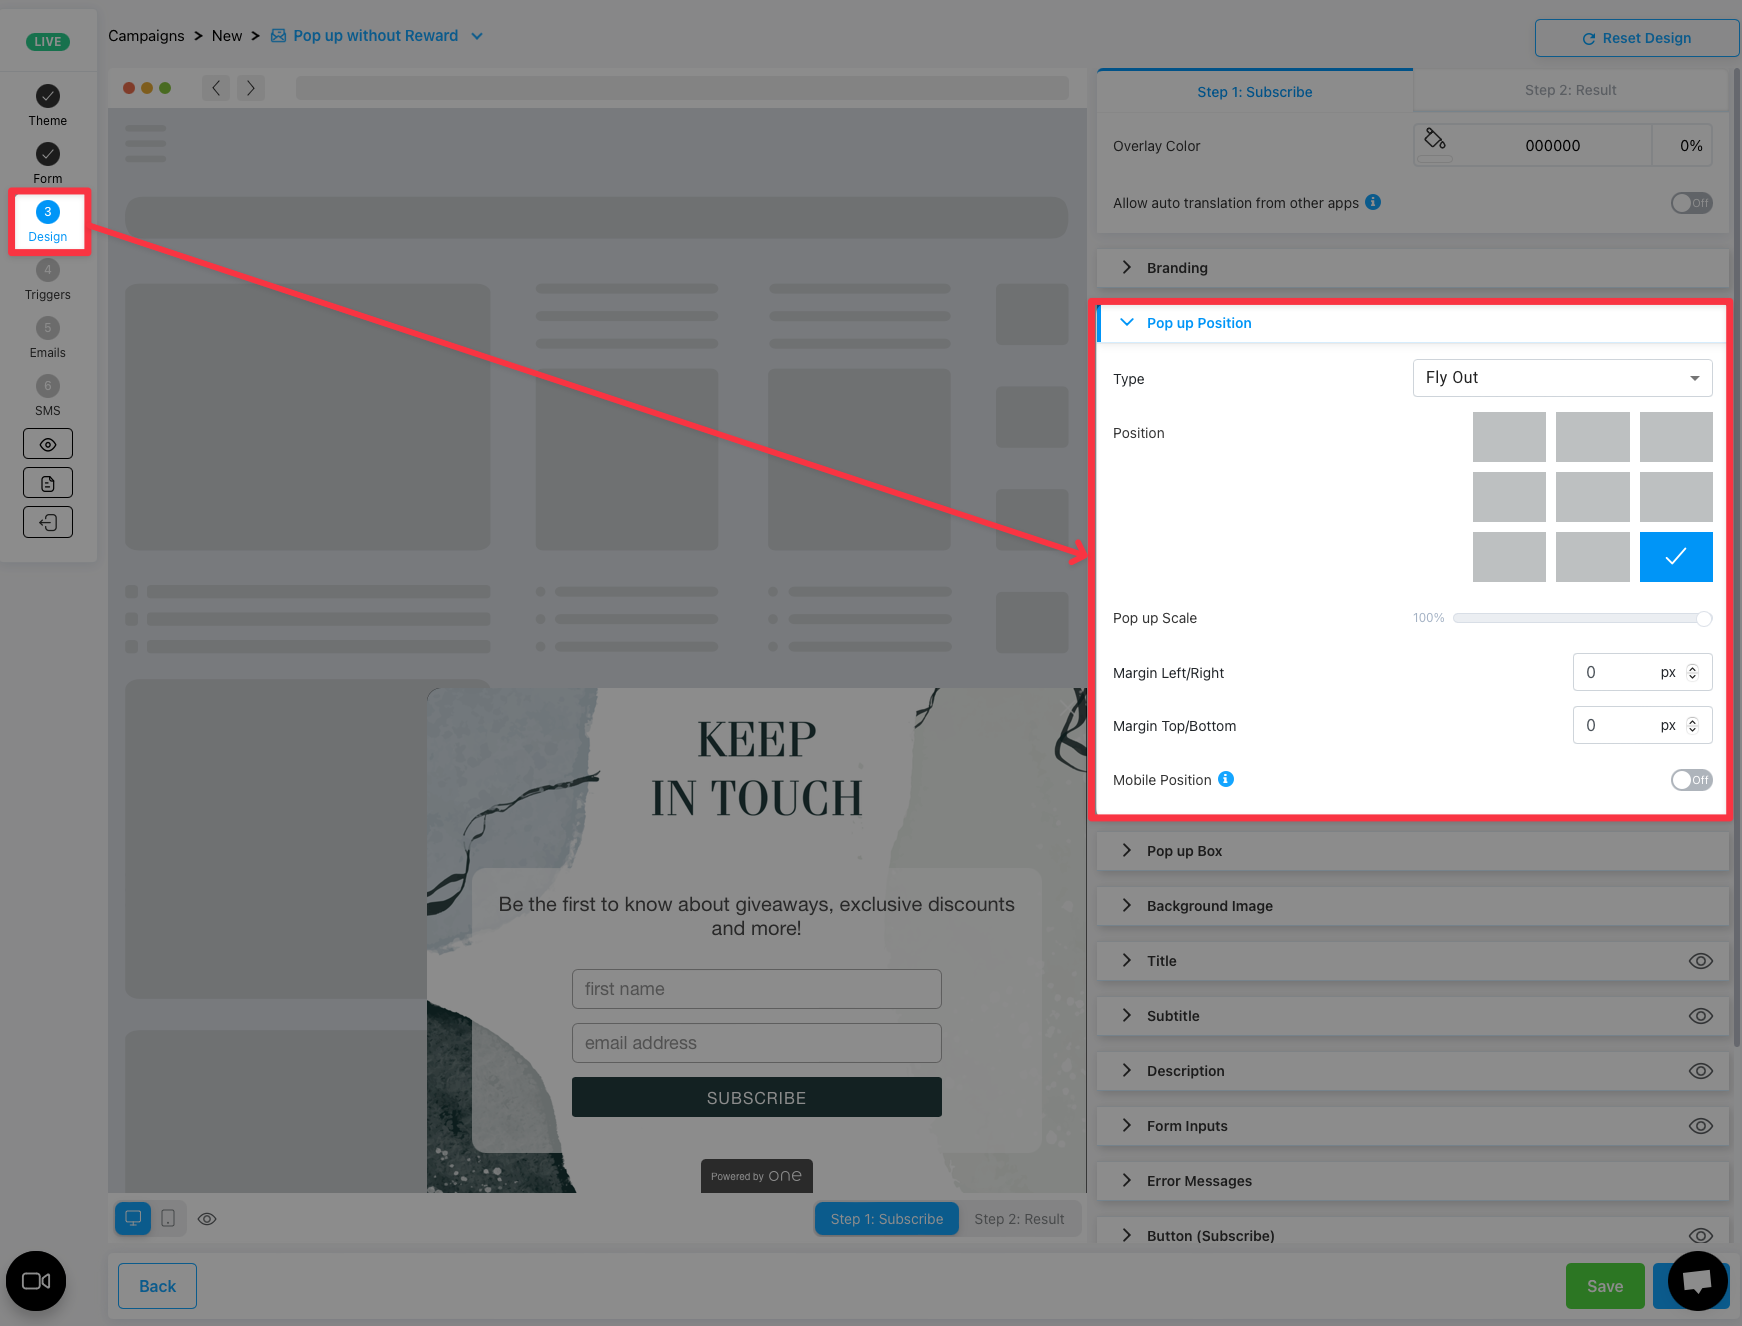
When setting up a pop up, in the "Design" step, look for the "Pop up Position" settings and change the type of Pop up to be "Fly Out". From there you can choose which part of the screen you want your pop up to appear from! Easy-peasy!
Check out a quick preview here:
(Note: the animation is much smoother, the preview is limited by the GIF)
We're confident that this new feature will help you boost your opt-in rates and create a more engaging user experience. As always, feel free to reach out if you have any questions! We're here to help you make your popups soar!
improved
Embedded Pop-Ups are Here!!
We're thrilled to unveil our latest game-changing update: embedded pop-ups! 🎉 Now you can sprinkle pop-up magic directly into your webpages, adding a dash of excitement and boosting engagement like never before.
Key Highlights:
- Seamless Integration:With embedded pop-ups, seamlessly blend pop-up forms, messages, or calls-to-action into your webpage's content. It's like adding secret compartments of awesomeness to your site!
- Customizable Design:Get your creative juices flowing! Customize the look, feel, and behavior of your pop-ups to match your website's vibe. It's like giving your pop-ups a fancy makeover.
- Contextual Targeting:Hit the bullseye! Target pop-ups based on user behavior or page content, delivering personalized messages that speak directly to your audience. It's like having mind-reading powers for your pop-ups!
How to Use Embedded Pop-Ups:
Check out our detailed help document HERE on how to get setup!
Feedback and Support:
Got questions, ideas, or just want to share your pop-up success story? Our support team is here to high-five you and lend a hand. Let's make your website pop-tastic together!
Thanks for being part of the fun and choosing us as your pop-up party planner. Let's turn those clicks into confetti with embedded pop-ups! 🎊
Hey SMS Superstars! 🌟 We're thrilled to roll out a new feature that will take your SMS marketing strategy to new heights! 🚀📱
📏
Introducing: SMS Segment Counter! 📏
Gone are the days of wondering how many segments your brilliantly crafted SMS will be split into! 🤔✉️ With our latest update, you're now equipped with a SMS Segment Counter that puts you in control! 🎉
Why is this so AWESOME?
1️⃣
Effortless Credit Management:
No more guessing games! 🎯 Know exactly how many message segments your SMS will be divided into based on character length. Efficiently manage your SMS credits like a pro! 💳💼2️⃣
Craft Longer Messages:
Express yourself without limitations! 📝🚀 Our SMS Segment Counter empowers you to compose longer, more engaging messages, ensuring every word counts!3️⃣
Avoid Surprises:
Say goodbye to unexpected credit deductions! 🚫💸 With the SMS Segment Counter, you'll be informed in real-time, allowing you to fine-tune your message length before hitting send!*Note: You may still experience some variability when using dynamic variables like the subscriber's name.
How to Use: It's as Easy as 1-2-3! 🌈
1️⃣
Compose your SMS:
Write your heart out! Craft the perfect message without worrying about length.2️⃣
Check the SMS Segment Counter:
Watch the magic happen! Our counter instantly reveals how many segments your message will be split into.3️⃣
Optimize and Send:
Make any adjustments needed, and confidently hit that send button! 🚀📤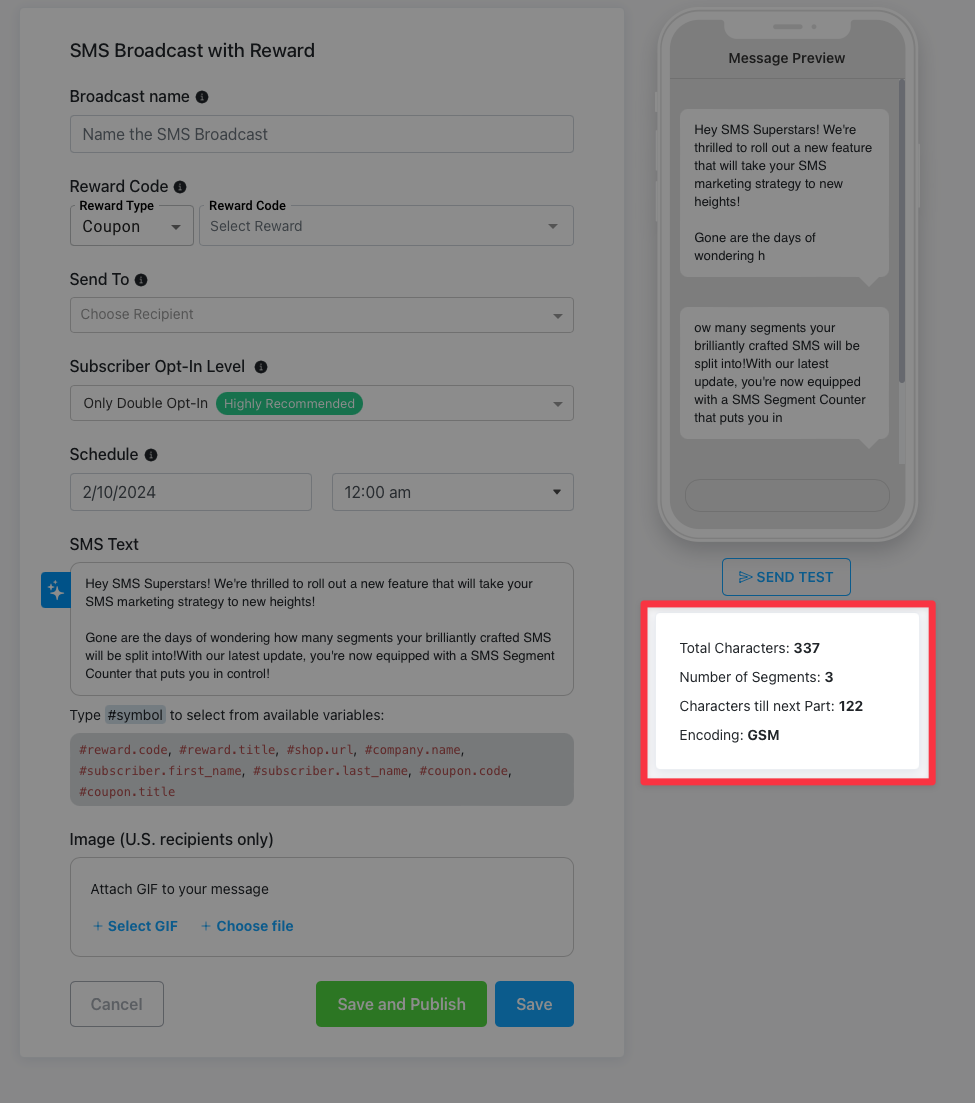
The counter will update live as you type, so you'll have real-time feedback!
Thank you for being part of our incredible journey! 🙌 We can't wait to see your SMS campaigns reach new heights with this fantastic update! 💬🚀
Happy Texting! 📱✨
🚀
Exciting News in ONE: Introducing the "Add to Cart" Trigger! 🛒
Hello ONE community! We're thrilled to share the latest and greatest addition to our platform – the game-changing "Add to Cart" trigger! 🎉
✨
What's the Buzz?
Imagine having the power to engage your customers right when they're making that crucial decision to add a product to their cart. Well, now you can with our brand-new feature! The "Add to Cart" trigger empowers ecommerce merchants to create dynamic and eye-catching pop-ups that appear the moment a specific product is added to the customer's cart.
🌟
Key Features:
- Precision Targeting:Define which products trigger the pop-up, ensuring your message reaches the right audience at the perfect moment.
- Customizable Designs:Unleash your creativity! Craft visually stunning pop-ups that align with your brand and captivate your customers.
- Promotions & Upsells:Seize the opportunity to showcase special promotions, discounts, or upsell suggestions right when your customers are most engaged.
🔧
How to Get Started:
Go to any ONE Pop Up and navigate to the "Triggers" section, you should see a section for "Add to Cart".
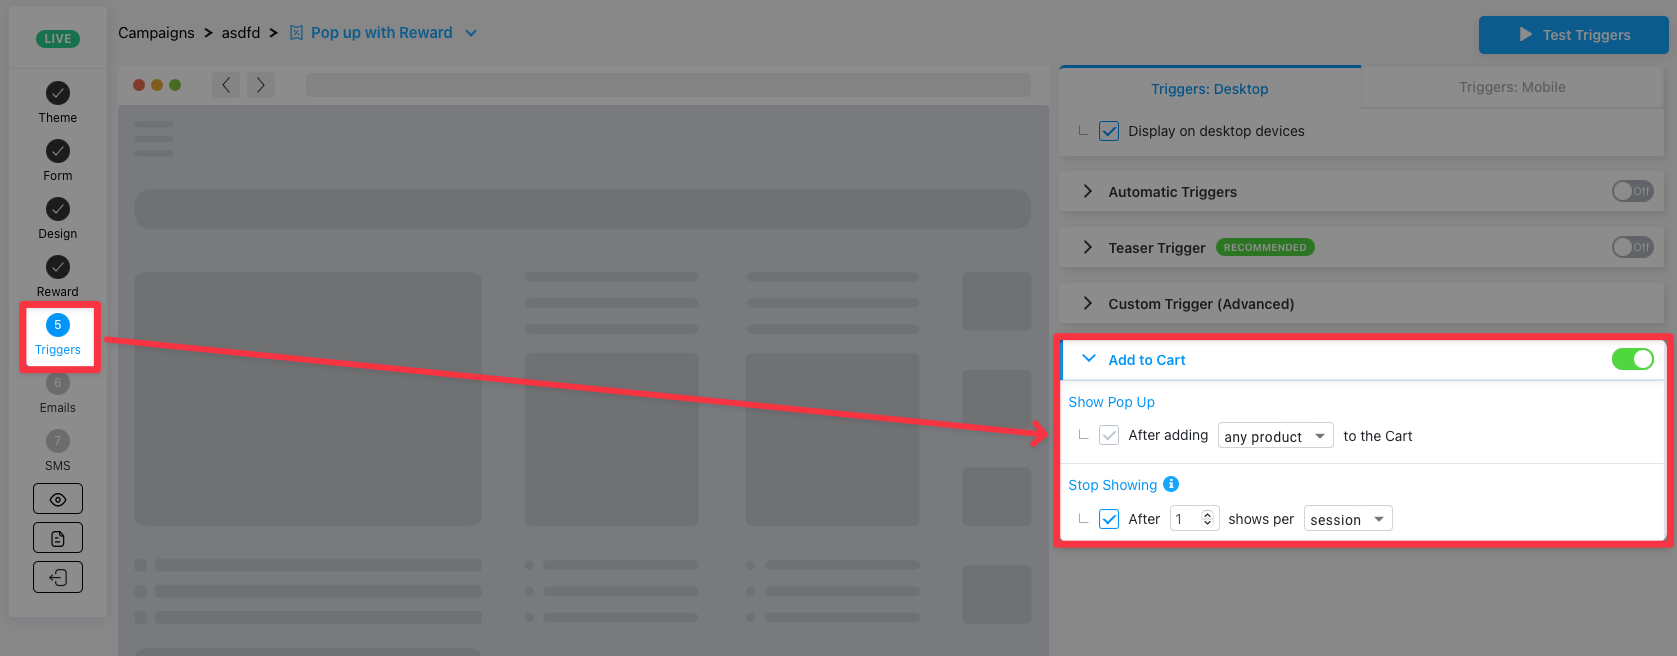
You can change these settings so that the pop up will appear when any product is added to the customer's cart, or a specific product.
🙌
We Want Your Feedback!
Your satisfaction is our priority. Share your thoughts, suggestions, and success stories with us. Together, let's make ONE even more incredible!
Ready to take your ecommerce game to the next level? Start using the "Add to Cart" trigger elevate your customer engagement like never before! 🚀💻🛍️
Happy selling!
The ONE Team
Hey there! We've got some exciting news to share with you today that will make your pop ups even more secure and bot-proof. 🛡️
🔒 We're thrilled to announce the latest addition to our Pro Plan: Captcha in our opt-in pop ups! It's the upgrade your pop ups have been waiting for. It provides another layer of protection by asking visitors to complete a Captcha when they enter a submission in your pop up. This will defend you against bot attacks and ensure genuine submissions.
🚫 Bots, Beware! With Captcha, it ensures that only real, engaged users are entering information in your opt-in pop ups. No more spammy submissions or unwanted sign-ups.
🎯 Why Should You Be Excited?
- Stronger Security:Rest easy knowing that your opt-in pop ups are more immune to the sneaky antics of pesky bots. Captcha is like a digital bouncer for your website!
- Higher Quality Leads:Bid farewell to fake email addresses and irrelevant sign-ups. Captcha ensures that the subscribers you gain are genuine and truly interested in what you offer.
- Enhanced Data Accuracy:With real users in your database, your analytics will be more accurate. This means better insights and smarter marketing decisions.
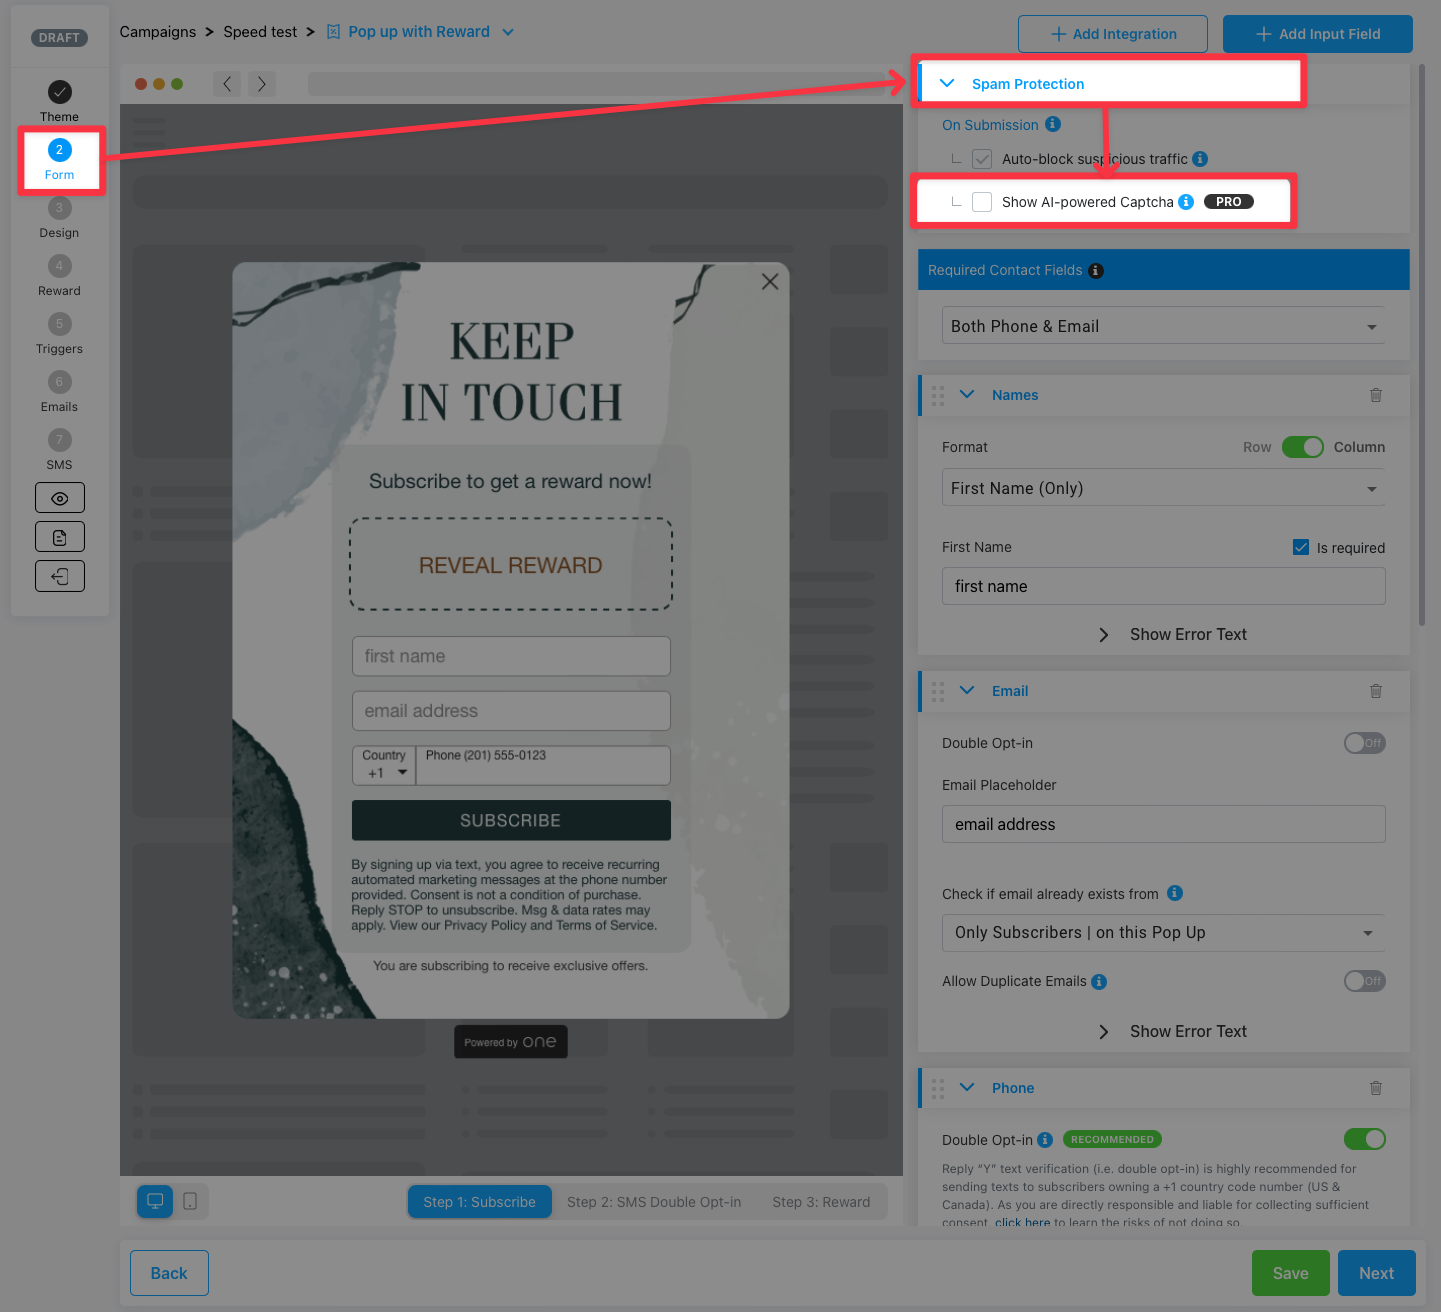
🎩 How to Activate Captcha
When editing your pop up, go to the Form field, and look for the "Spam Prevention" dropdown on the top right. Simply fill in the checkbox for "Show AI-powered Captcha" and you're good to go!
🥳 Upgrade to Pro and Activate Captcha Today!
As always, if you have any questions or need assistance, our friendly support team is here to help. Get ready to take your pop ups to the next level! 🚀
ONE Team 💃🕺
Hey ONE Users,
We're back with some thrilling news that's going to elevate your messaging game! 📢
What's New?
Starting right now, you have the power to send SMS messages to subscribers that you've collected outside of our app! 🌟 For example: through the Shopify checkout flow, 3rd party apps, etc.
Why is this a game-changer?
- Seamless Communication:No more switching between different messaging platforms. You can now manage all your SMS communication in one place – right here!
- Increased Reach:As long as the SMS subscribers you've collected outside of the ONE app are in your Shopify account, we can send to them! We'll also continue to automatically sync all of the SMS subscribers you've collected from the ONE app to your Shopify account so you don't have to lift a finger.
- Enhanced Tracking:All your favorite features for managing SMS campaigns are still here. Real-time delivery tracking, message scheduling, and analytics – you've got it all!
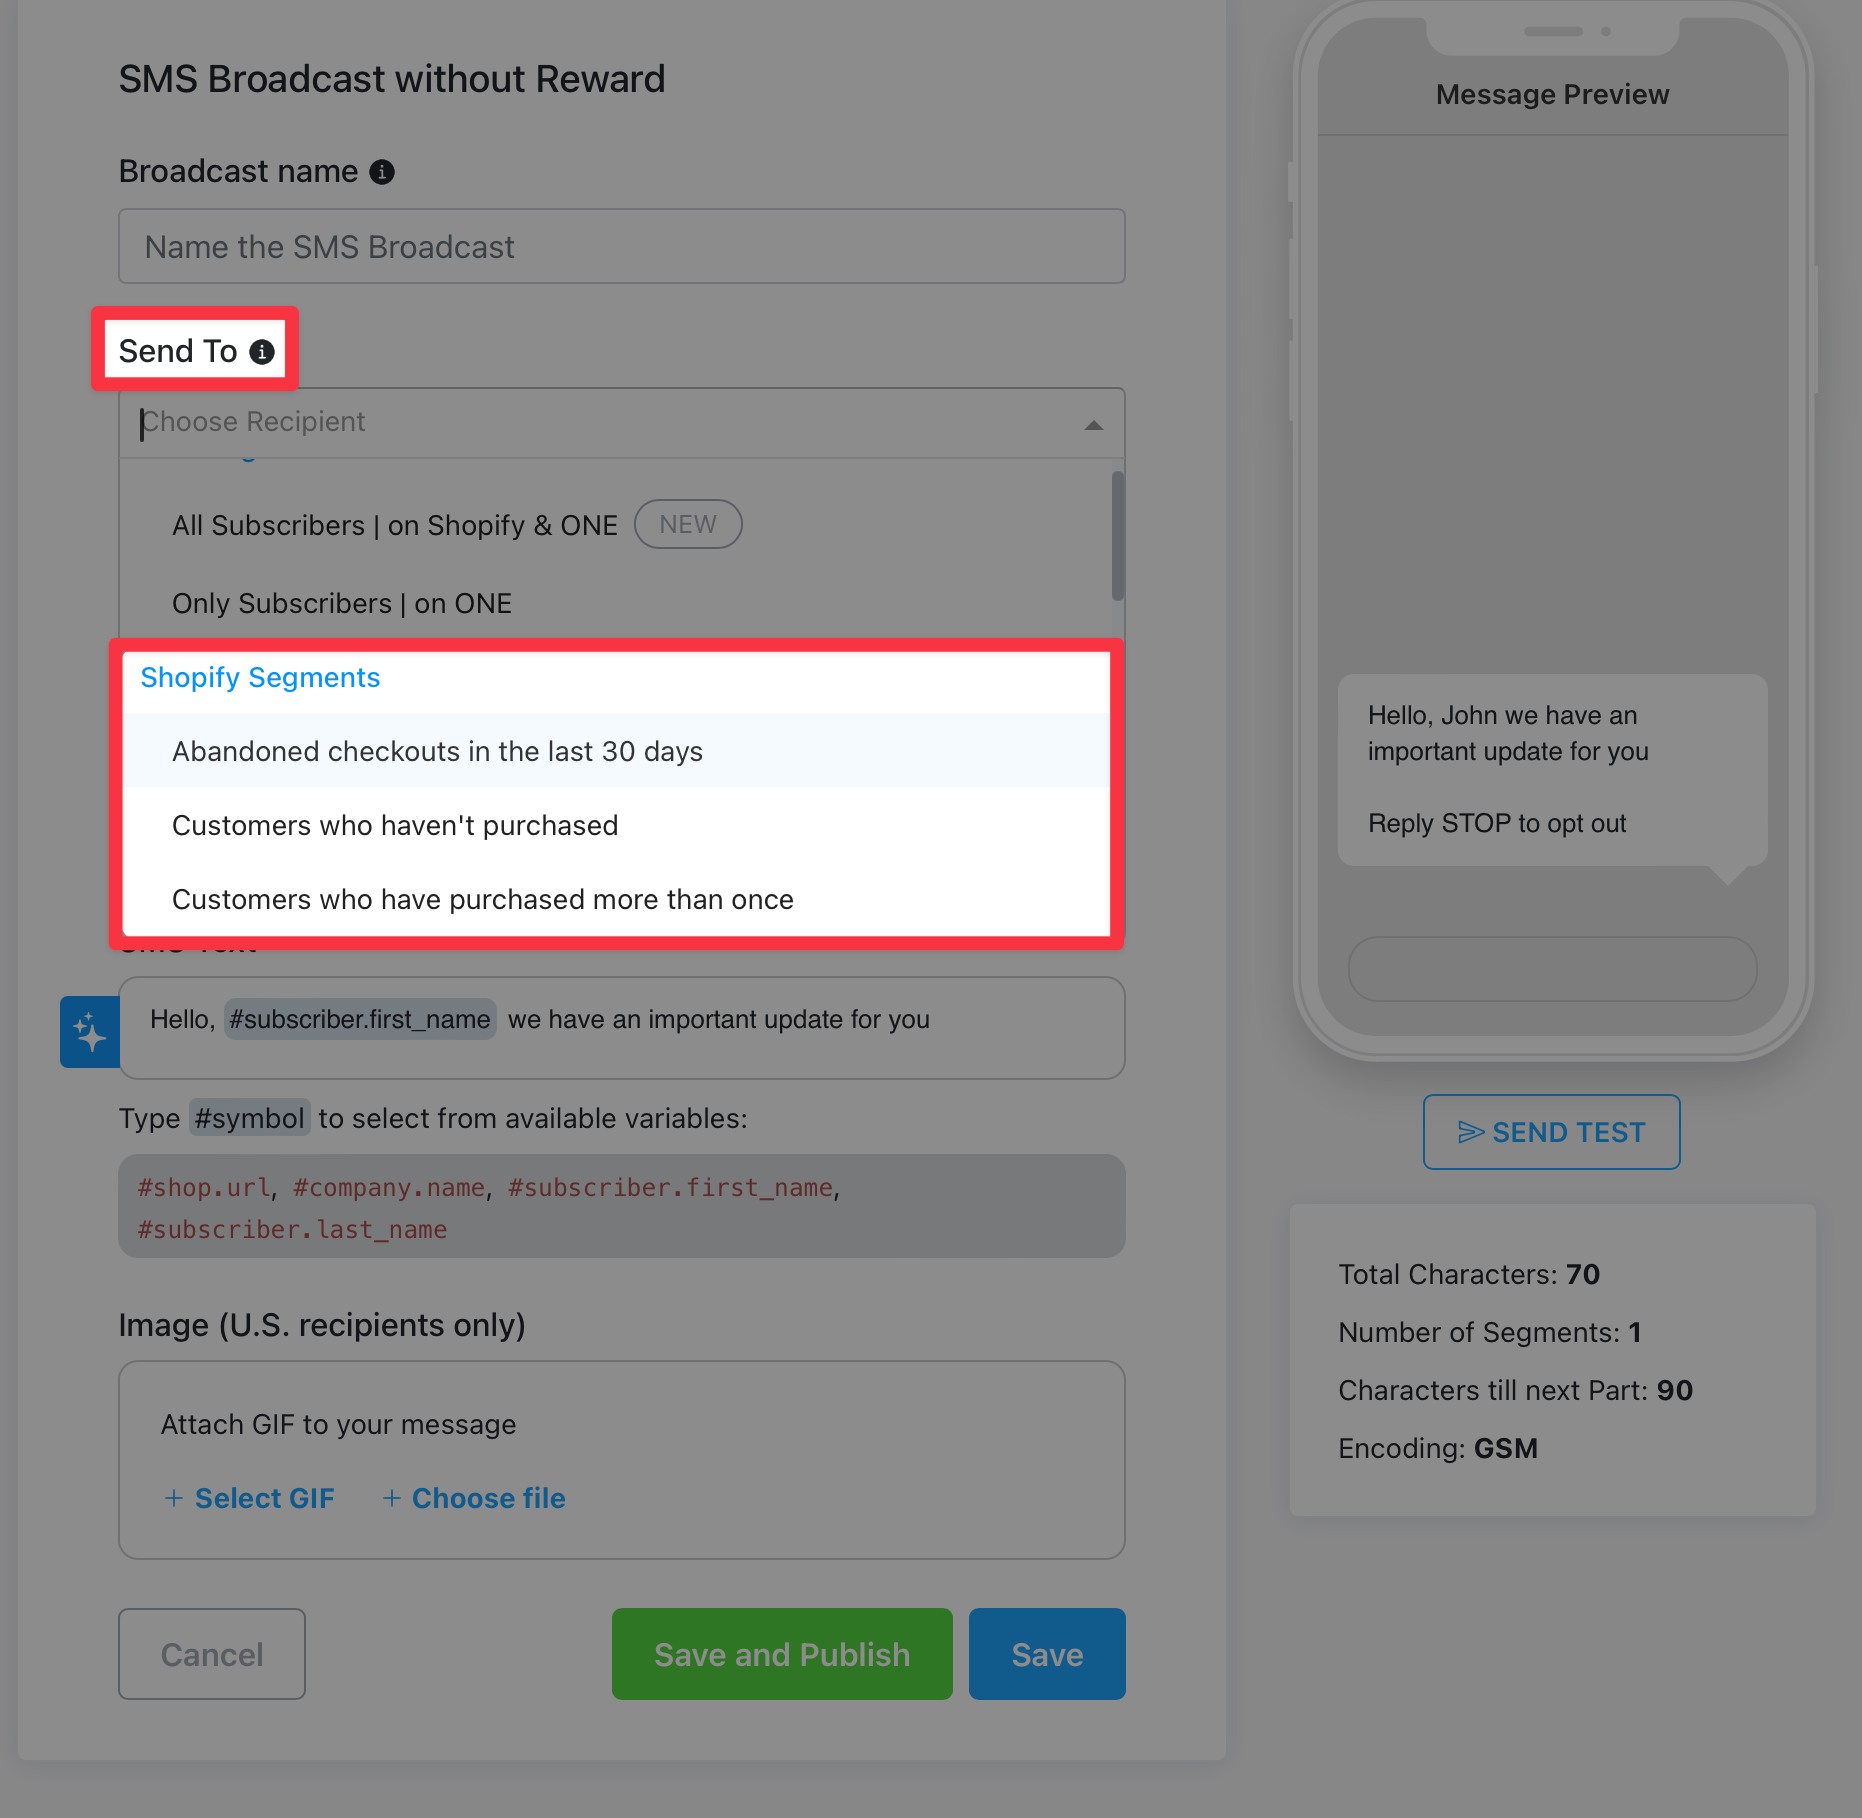
How to Get Started:
- Log in to your ONE account.
- Head to the SMS section.
- Create a new SMS broadcast
- Select "All Subscribers | on Shopify & ONE"
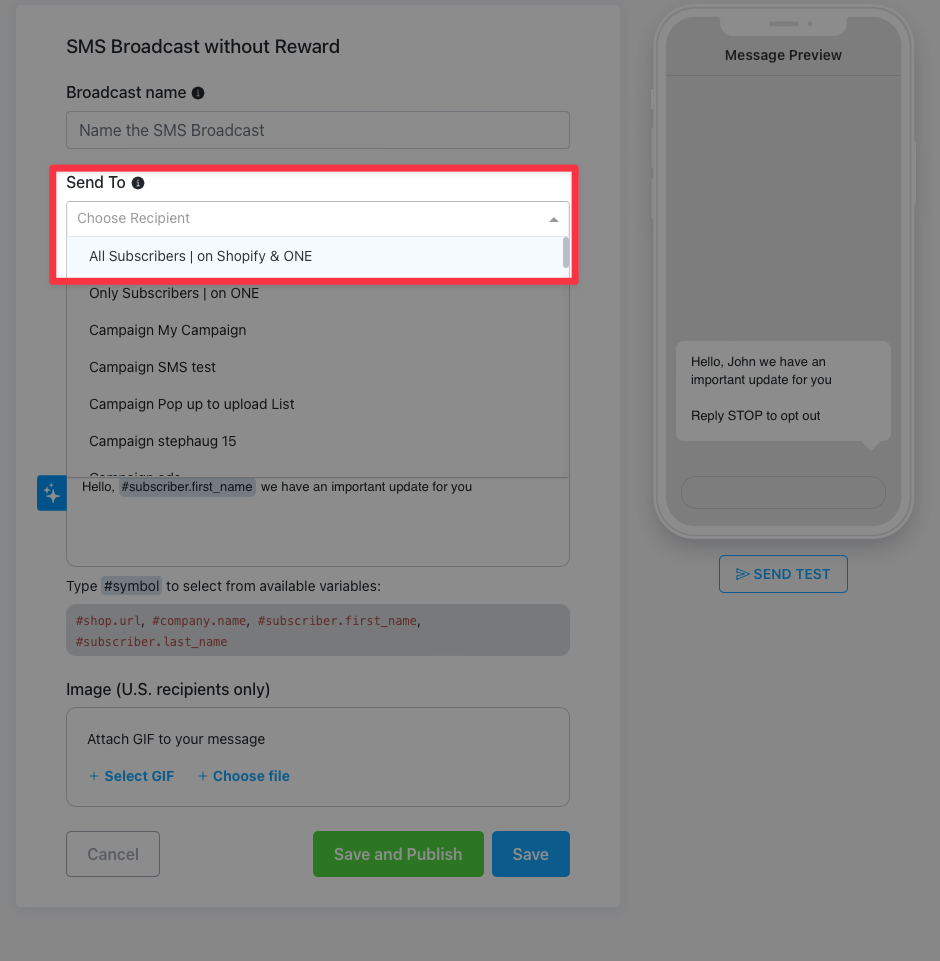
If you are selecting that option for the first time, you'll prompted to fill out a short form asking you to confirm that you are sending to SMS subscribers that were collected in accordance with TCPA guidelines.
We believe this update will revolutionize the way you connect with your audience by allowing greater reach than ever before!
Have questions or need assistance? Our support team is here to help! 🤝 Reach out to them at via live chat if you have any questions!
Thank you for being part of the ONE community. We're dedicated to making your experience exceptional, and this update is just the beginning.
Start messaging like never before – you've got the power! 💪
Stay tuned for more exciting updates coming your way soon.
Cheers to seamless communication! 📲
ONE Team
Hello there, friends! We're back with another exciting enhancement to elevate your product pop ups to a whole new level and entice your customers to purchase your hottest products. 🚀
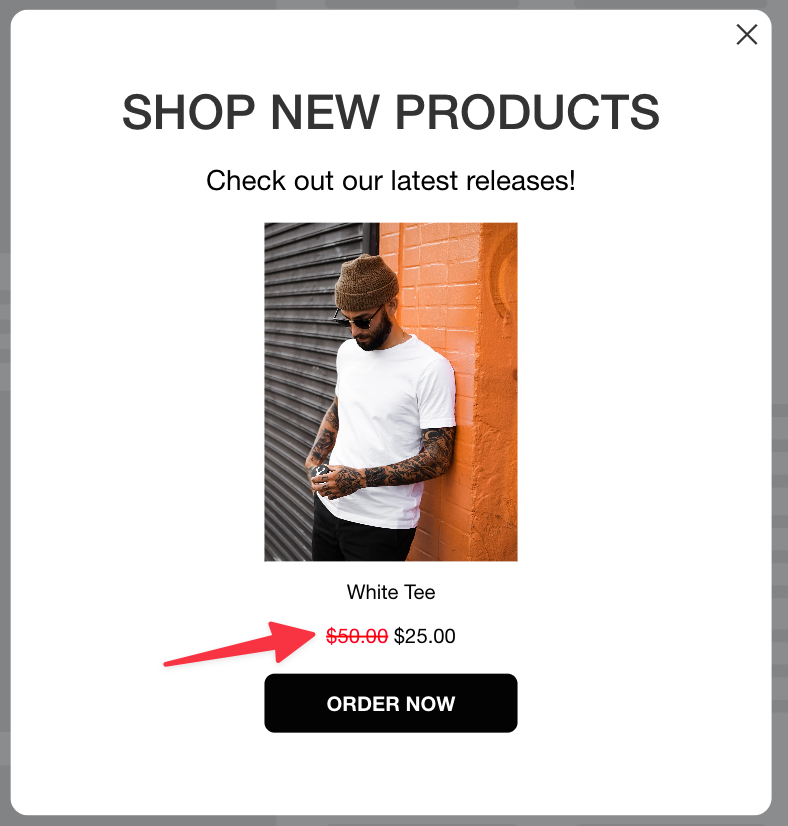
✨ Introducing: Price Slash Visuals!
💰
Why You'll Love This Enhancement
- 🚀 Instant Clarity:Now when your customers see a product with a "Compare at" price in the pop up, they'll instantly recognize the amazing deal you're offering. A sleek graphic of a slash through the higher price clearly indicates how the new price is easier on the wallet and to be taken advantage of.
- 🔥 Boost Sales:Shoppers love a good deal, and this eye-catching visual cue highlights the value you're providing. Watch as your conversion rates soar!
- 👀 Enhanced Product Visibility:The price slash visual draws attention to the product's discount, making it impossible for potential buyers to miss out on your irresistible offers.
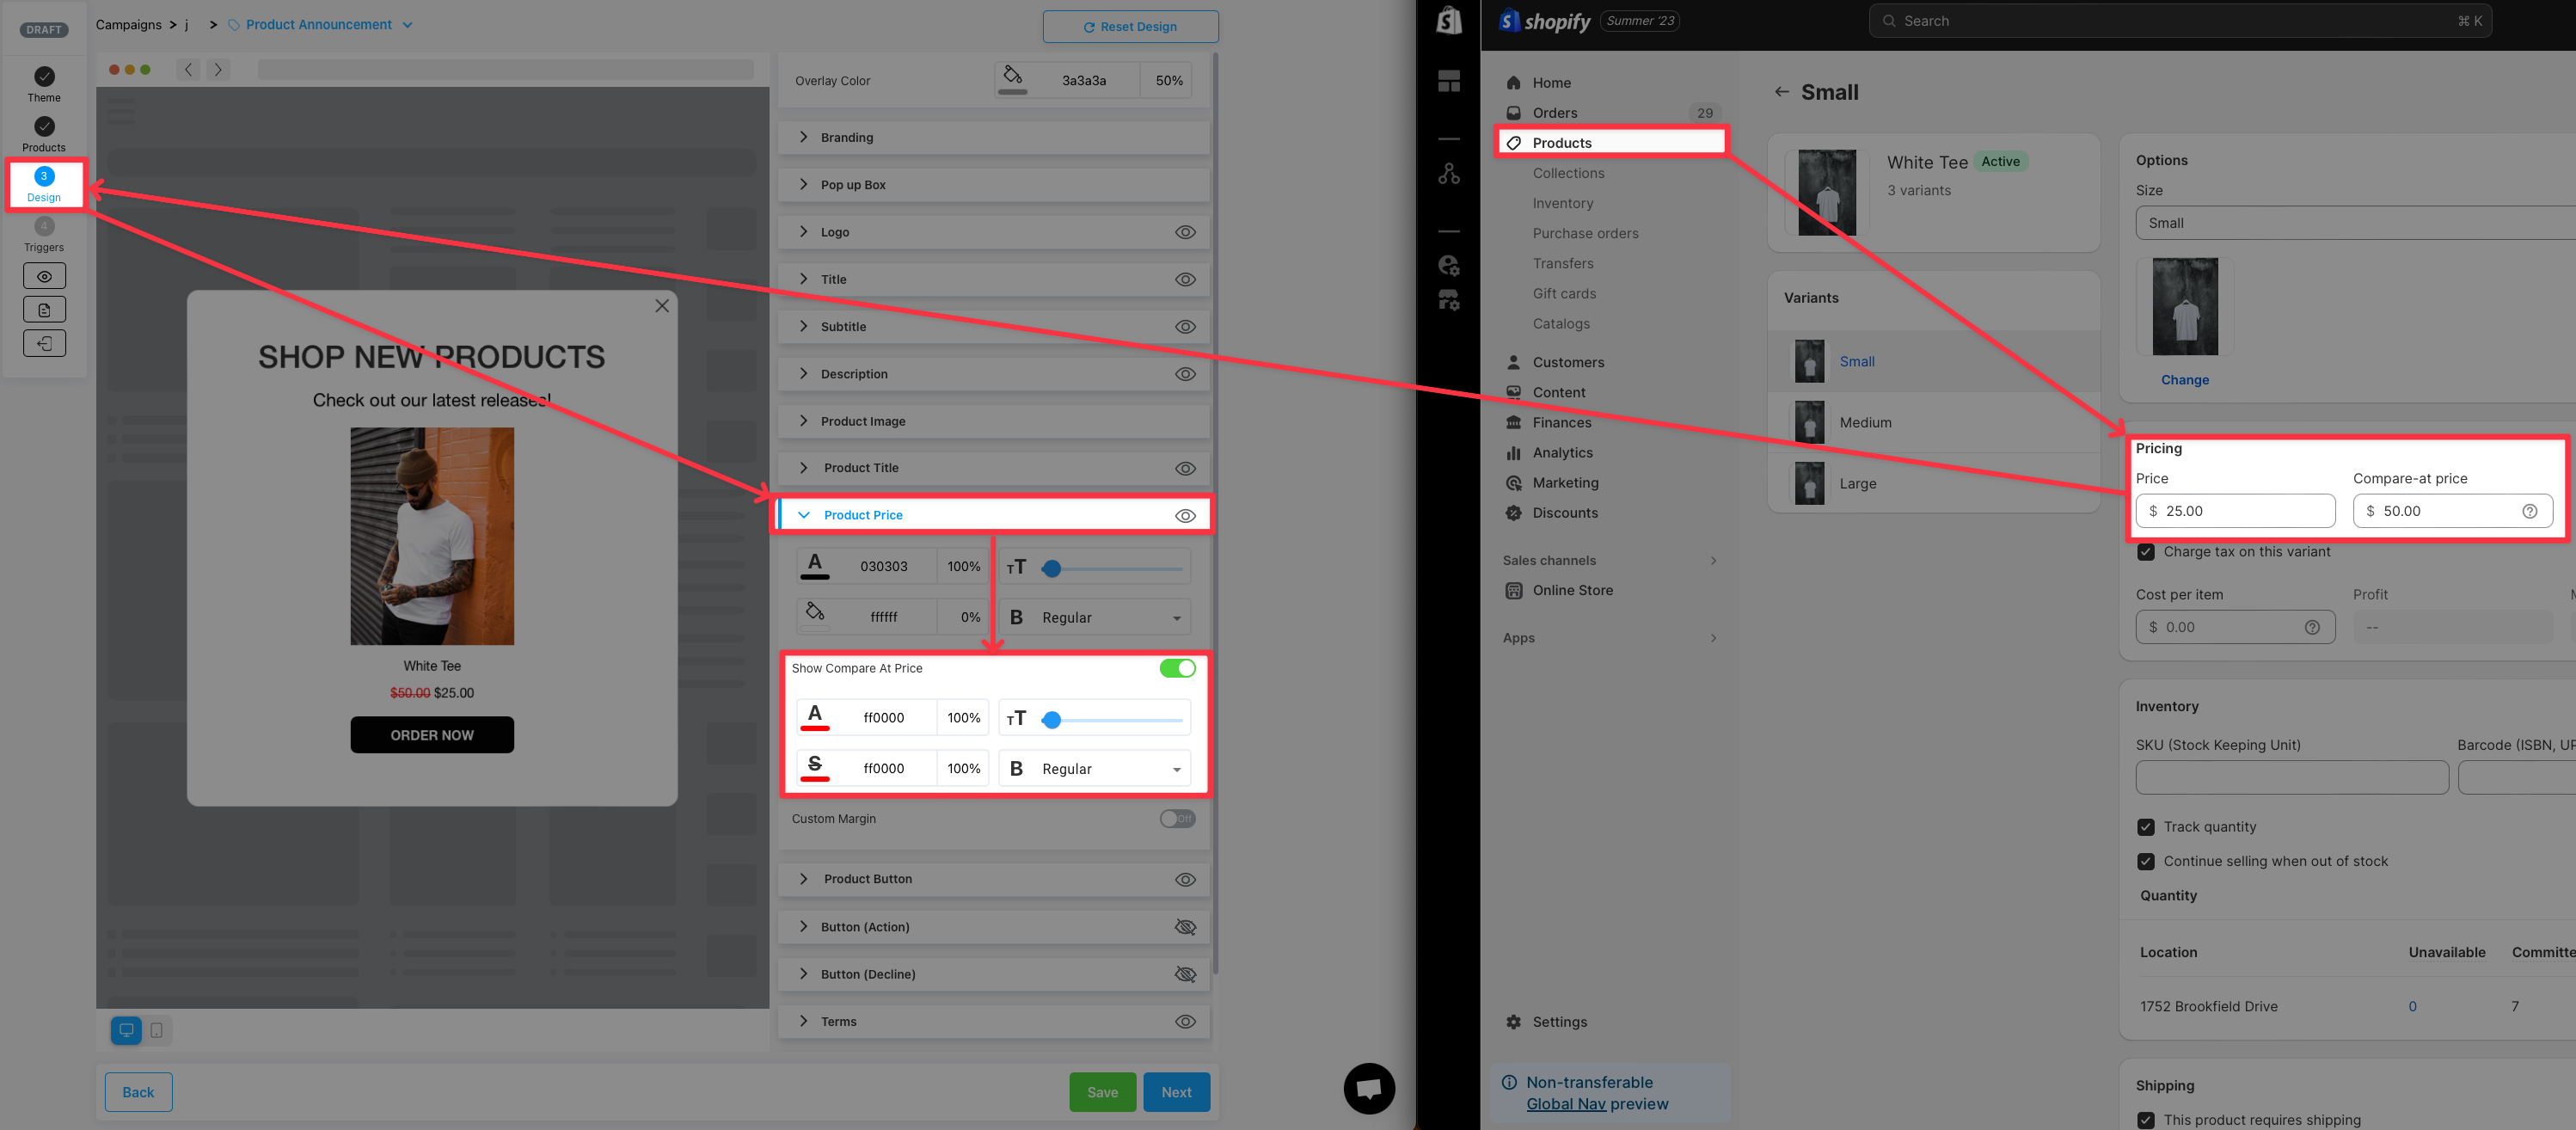
🌟 How to Activate the Price Slash Magic
First, make sure to add the "Compare At" price for your product in Shopify under your product settings.
Second, add that product to your Product Pop up.
Third, enable the "Compare At" price option under the Product Price Section.
💡 Not Using "Compare at" Prices Yet?
If you're not taking advantage of this feature, now's the perfect time to start! Simply add "Compare at" prices to your products in Shopify, and our pop up will do the rest.
We're excited to see your pop ups shine with this upgrade and your sales soar to new heights.
As always, if you have any questions or need assistance, our team is here to help. Let's make your pop ups irresistible!
ONE Team 🤗🛍️
Load More
→